This blog post is written by one of my life characters and good friends, Jill! She is a math teacher, turned tech teaching guru who just moved to the PE department this year to spice things up! Her tech teaching knowledge adds spice to the classroom! Thanks, Jill!
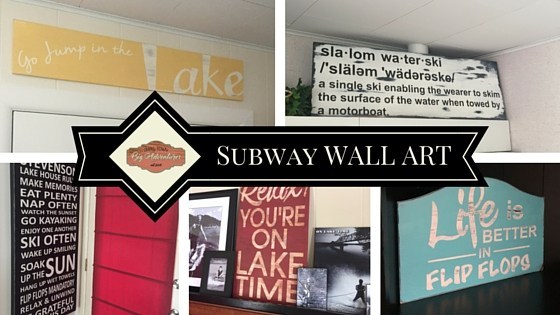
I am super excited to share how I make Subway Wall Art. I must give a quick disclaimer before I begin. My husband is really not a fan of said wall art so every piece in the image above is at our little piece of heaven at Table Rock Lake. For some reason, he will let me do whatever I want there (smart man). As you can see from the pics, these signs are EVERYWHERE. Haha!
What paint should I use?
I have used several different methods for creating these little jewels. Leftover house paint, both interior and exterior, spray paint, and acrylic. The easiest and cleanest method is acrylic paint. I use Waverly Inspirations Matte Chalk Finish Acrylic Paint from Walmart and Apple Barrel from Amazon. They stock many color options and the price is affordable.
There are a few things you need to know before I get to the steps. I am a Career and Technical Education instructor and one of the courses I offer is an In-House Training class. It is project-based where local businesses and community members “hire” us to do print projects. We have a Roland Camm1 GX-24 Vinyl Cutter that we use to cut the words for our signs. Any cutter/plotter will work like a Cricut Explore or Silhouette Cameo. Subway wall art is something we started doing this past year. In our small town we have a cabinet manufacturer that graciously brings us scrap pieces of plywood to use for these signs. The pics in the steps below are from a few projects my students did at the end of the year.
Steps to create Subway Wall Art
- Prepare your piece of plywood. When we get the scrap pieces from our local cabinet manufacturer, they are usually already sanded. Otherwise, they would need a quick go over with a fine piece of sandpaper just to knock off any rough spots.
- This is the part that is difficult for some to grasp. The first coat of paint is the color you want the text to be when you are finished. In this pic, Tori is using a black matte acrylic paint by Apple Barrel from Amazon. Don’t forget to paint the edges as well. Let this dry completely. If you don’t, when you peel the vinyl off in step 6, it will take some of the paint with it. Sometimes that is okay. See “Flip-Flops” pic below.
- Create your vinyl lettering. Here we are using a Roland CAMM 1 GX-24 vinyl cutter/plotter but any cutting tool like a Silhouette CAMEO or a Cricut EXPLORE will work.
- Apply your cut vinyl to your board by adhering it to the top with tape then carefully, peel the backing to adhere it while using a squeegee, if you have one, if not, a driver’s license or credit card will work.
- Once the vinyl is on, simply paint over it with the color of choice.
- This is where the magic happens. Once the paint has dried a little, start peeling the vinyl off using, what I call “dental tools” from Harbor Freight. You should have sharp clean lines for your letters once they’re pulled off.
- At this point, you are done. If you want a distressed look (see pics below), you can sand the edges to reveal the underlying paint, use vaseline before applying the top coat or use leftover stain. I recently saw a post at The Wood Connection Blog using duct tape. I will be trying this method on my next masterpiece!
Every time I do one of these, I try a different method. And each method has always turned out great. I do think the acrylic paint is by far the easiest and less messy. Good luck!


